
Gateway – Full-Cycle Claims Management
MY PROCESS
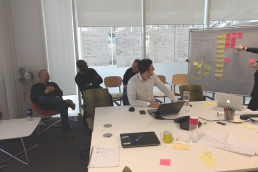
The design sprint is the process I use for answering critical business questions through design, prototyping, and testing ideas with users. It’s a tried and tested methodology and at the heart of all the new features and products I introduce into Gateway. The Gateway platform is an online system in the insurance sector that places control of the entire claims management process in the policyholder’s hand.
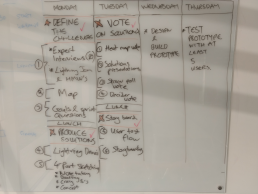
I currently facilitate 2-3 design sprints per month, and these are predominantly for introducing new features into Gateway. Now, care of AJ & Smart, we have version 2.0 of the sprint and I favour this 4-day version for its time saving properties – getting key stakeholders together is never easy!
I have documented and illustrated how a typical design sprint takes place and this particular session is from our last sprint introducing the ‘Total Loss’ feature into Gateway.
MY ROLE
Facilitator and UX Lead
PROJECT TYPE:
New feature development and integration into the Gateway platform.
KEY CHALLENGES:
Working on Gateway presents numerous challenges, multiple scrum teams, product owners and regions. When adding new features to an existing platform there are lots of considerations but for this session, they must always start with the user.
AIMS AND OBJECTIVES
Despite the subjective nature of a design sprint the primary objective remains the same;
At the end of the design sprint we will have designed and tested an interactive prototype with 5 users. The prototype will be developed taking into consideration;
FROM THE UX TEAM
User research
User interviews
User pain points
User journeys
User personas
FROM THE PRODUCT TEAM
Functional requirement
Jira Stories/Epics
Process flow
FROM THE DEVELOPMENT TEAM
Technical possibilities & limitations
Sizing and prioritising stories and sprint planning
DEFINING THE CHALLENGE
Defining the challenge is the first task of a design sprint and this is broken up into 2 separate activities, ‘Ask the experts’ and a ‘how might we’ exercise. I’ve found that this order helps us to dive deep into the problem and ask more effective questions helping us gain a better understanding of the situation.
ASK THE EXPERTS
Usually primary users, we identify some key stakeholders during the user interviews phase and then invite them back to the design sprint to share their knowledge with the team. In actual fact, on our most recent design sprint, when the Gateway users found out what we are doing, they are queuing up to attend, they have so many gems of information to impart to us, not only to improve the user experience, but also to make their day to day lives much easier.
THE HOW MIGHT WE EXERCISE
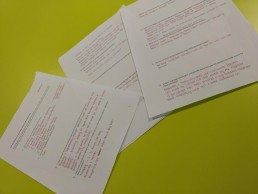
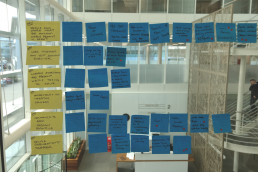
The ‘HMW’ exercise is a reframing technique designed to reframe problems as opportunities. Developed by Proctor and Gamble in the 1970’s it’s become a mainstay for UX’er who adopt the GV design sprint methodology. This is a fully collaborative part of the session where each member of the team is issued with a sharpie and stack of different coloured post-it notes. They are then asked to list firstly, to list their concerns / problems and then their positives, after a quick heat mapping exercise, the key issues are reframed as ‘HMW’ statements, voted on and made actionable. The exercise works due to simple semantics. ‘How’ assumes that there are solutions out there, so it provides confidence.
This is a great exercise as once complete themes and patterns emerge we can usually pin point a very accurate picture of what to do next.
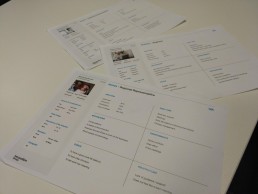
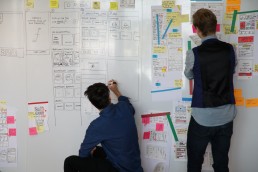
JOURNEY MAPPING
Journey mapping is a crucial part of that design sprint process, when used correctly it’s such a good tool for uncovering optimal user experiences and touch points. An experience map emphasises the holistic user experience, demonstrating the pits and peaks experience whilst interacting with our product or service. The process of mapping uncovers the key customer moments that, once improved, will undoubtedly unlock a more compelling and more valuable overall user experience.
At the heart of the experience map lies an archetypal customer journey, usually a happy path that is created from an amalgamation of all the customers interviewed. The purpose is to show the persona going from point A to point B as they attempt to achieve a goal or satisfy a need.
Journey mapping starts with a series of predefined scenarios attached to a persona, In the sprint scenario, we divided the group into 3’s or 4’s and each group is given a scenario and persona to work with, the objective is for each group to create a scenario specific journey map that highlights customer behaviour, pits and falls and interactions across channels in terms of touch points.
LIGHTNING DEMOS
The Lightning Demos part of the design sprint is essentially a short research session, the purpose of which is to have the group explore and identify existing products or services that currently exist and that may be able to give is insight or impact us directly on the work we are doing. Following Jakob’s law, the purpose of the session is not to come up with things from scratch but to try to align ourselves with our competitors in terms of what users expect. Once the time is up (usually 25mins for this) each member of the group is then asked to present their findings to the group, writing the ‘big idea’ from each of their examples on a post-it note on the board. Once each member of the group has presented their findings, we then moving on, keeping the big ideas up on the board acts as inspiration for our sketching phase as we go.
SKETCHING
The four-part sketching exercise;
1) The first part of our sketching session is actually taking notes, everyone in the room is issued with a clipboard and asked to walk around the room and soak up everything they see, the Journey Maps, HMW statements, Sprint Goals and the results from the Lightning Demos. The idea is that group members are encouraged to copy down things of interest, ideas, to get the creative juices flowing ready for sketching possible solutions in the following exercises.
2) Secondly, we look at the ideas in more detail, looking at the notes we made group members are then encouraged to make some of the ideas from their notes and things they found interesting more tangible. The idea is to just make a start, drawing little sketches, nothing beautiful, it just needs to be a start, moving us forward towards the final sketching tasks.
3) Thirdly, Crazy 8’s – Moving on from the ideation phase, now it’s time for some fun, group members are asked to fold one piece of A4 paper in to 8 sections and then asked to take one or two ideas from the previous activity and sketch out 1 idea per minute in each of the rectangles on the paper – 8 sections, 8 minutes. The idea is to ‘get the idea out’ on paper, it’s a fast and fun exercise and the purpose is to continue to inspire the solutions exercise. Again, it’s not supposed to be pretty, members of the group are asked to just keep sketching, focusing on trying to produce one rectangle every 60 seconds.
4) Lastly, Solutions – The most important step of the sketching phase. Using a combination of A4 pages stuck together and smaller A6 pieces used for more detailed sections or notes, the idea is to create a wireframe, focusing on one idea perhaps something that came up in the notes or in a lightning demo. It’s important that group members try their best to illustrate the direction they would like to go in if their solution was prototyped. If nothing more, the wireframe should produce interesting results. It’s not easy to get everyone involved here, but it’s important the group are reassured that it’s really only supposed to be a quick drawing with sharpies and post-it notes annotating simple instructions or directions. Ugly results are okay, it’s not a drawing competition, it just needs to be clean, with clear words if nothing else other group members need to understand the concept. I make sure that this task is anonymous where possible, I like to give each concept has a nick name so it can be referred to by the group.
VOTING
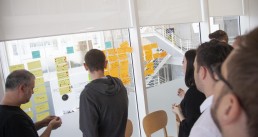
In order to showcase everyone’s best ideas, we tape the groups solution sketches to the wall in one long row. Then, similarly to previous exercises, it’s now time for some heat map voting. Each of the team is instructed to review the sketches silently and put 1-3 of their dot stickers beside every solution they find interesting.
Then using the speed critique technique, we spend three minutes per sketch, as a group discussing the highlights of each solution. I like to capture standout ideas and important observations on a white board with other ‘nice to have’ ideas. At the end of this part of the session before we move to a straw poll, it’s really important to ask the sketchers if the group missed anything about their solutions.
Once the discussions are complete, we then conduct a straw poll where each person silently chooses a favourite solution. All at once, each member of the group places their one large single dot sticker next to their favourite solution to register their vote. At this point it’s time for the ‘Supervote’, the Decider, the person with the most sway, and in this case the head of global product, chooses the solutions we’ll go on to prototype the next day and test with our users.
STORYBOARDING
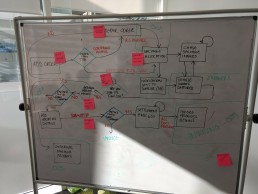
Storyboarding is the process of placing our sketches in sequence and ultimately creating a representation, an at a glance visualisation of the user’s experience with our product or feature. It’s a very much like thinking of the feature as if it was a film. We move our existing sketches to a new section of the wall and make up a storyboard with the solutions in sequence, at this stage any gaps are ‘mocked up’ quickly and collaboratively to give us just enough detail to prototype the solution. We normally aim for the finished story to be no more or less than five to fifteen steps.
PROTOTYPING
I think of a prototype as an experiment to test out a hypothesis. A design sprint prototype is a realistic facade based on the solutions we validated and voted for in the final sketching phase. We need to focus on building just enough to make the prototype real enough to get an authentic response from at least 5 real users. When building the prototype, it’s important to think critically about what we build in order to validate (or not) out hypothesis. UX and UI work together to prototype, mapping out the flow of the experience, building only the steps we need to test with the users. The prototype is not a full user interface, it’s purely smoke and mirrors, just enough to get the feedback we need to move forward to development – give or take a few iterations.
USER TESTING
Testing with users is our chance to validate (or not) the previous weeks work and collaborative effort from the team. We will put our testers in front of the prototype, on a real device and we will ask them to use the application as we carefully observe the interactions and reactions. Testing with users face to face allows us to learn from facial expressions, gut reactions and body language. and 5 seems to be the magic number, it’s easy to spot patterns when interviewing 5, it’s just enough to give us the insight we need.
Finally, and after integrating any iterations learned from the testing phase, it’s time to extract the findings from design sprint. I like to schedule this session with the sprint team and PO a few days after the tests, usually the following Monday. This gives us time to discuss the outcomes of the design sprint retrospectively and decide upon the next actionable steps. This is usually to iterate, and then build out the UI ready for the first development sprint.